
🧵 First Steps with Text Strings in Python: [Part 2 of 3]: f-strings, Indexing, and Slicing
F-strings: The Modern Way to Format Text in Python
F-strings, introduced in Python 3.6, revolutionized how we work with text in Python. They are more readable, efficient, and less prone to errors than traditional methods. For researchers and data analysts, f-strings are especially valuable because they:
Allow direct insertion of variables and expressions into text.
Significantly reduce the amount of code needed.
Facilitate the creation of complex formats for reports and analysis.
Improve code readability, making it more maintainable.
Tired of using + to join texts or dealing with .format()? F-strings (also known as 'formatted string literals') are the modern and elegant solution.
# Basic example of f-strings
name = "Anna"
lastname = "Smith"
print(f"Full name: {name} {lastname}")  # Result: Full name: Anna Smith

# Text alignment and formatting

course_name = "Python"
print(f"{course_name:=^20}")     # Result: =======Python=======
print(f"{course_name:>20}")      # Result: '              Python'
print(f"{course_name:<20}")      # Result: 'Python              '

# Combining variables in text

course = "Python"
level = "basic"
print(f"Course in {course}, level {level}")  # Result: Course in Python, level basic

# Using f-strings with multiline text

title = "WELCOME"
print(f"""
{title:=^30}
Course: {course}
Level: {level}
{"=" * 30}
""")

# Controlling line ending with end=

print(f"{name}", end=" | ")     # Prints: Anna |
print(f"{lastname}")            # Prints: Smith on the same line

# Example with interview responses

question = "What do you think about Python?"
answer = "I love it"
print(f"""Question: {question}
Answer: {answer}""")
Format Modifiers in f-strings: A First Guide
F-strings offer a variety of format modifiers that allow us to customize text presentation. After ':' we can use:
:20to specify total width (e.g.,{text:20}).:.3to limit text length (e.g.,{text:.3}).:^to center text (e.g.,{text:^10}).:<for left alignment (e.g.,{text:<10}).:>for right alignment (e.g.,{text:>10}).:_^10to fill with a specific character (e.g.,{text:_^10}fills with _).:>10.3to combine width and limit (e.g.,{text:>10.3}right aligns and limits to 3 characters).:{variable}to use variable width (e.g.,{text:{width}}where width is another variable).
# Text alignment and formatting
course_name = "Python"
print(f"{course_name:=^20}") # Result: =======Python=======
print(f"{course_name:=>20}") # Result: ==============Python
print(f"{course_name:=<20}") # Result: Python==============
print(f"{course_name:^20}")  # Result: Python
print(f"{course_name:>20}")  # Result: Python
print(f"{course_name:<20}")  # Result: Python

# Using f-strings with multiline text
title = "WELCOME"
level = "basic"
print(f"""
{title:=^30}
Course: {course_name}
Level: {level}
{"=" * 30}
""")

# More examples of format with f-strings

width = 10
print(f"{course_name:^10}") # Result: Python
print(f"{course_name:>10.3}") # Result: '_______Pyt'
print(f"{course_name:^10}") # Result: ' Python '
print(f"{course_name:>10.3}") # Result: ' Pyt'
print(f"{course_name:{width}}") # Result: 'Python '
First Challenge: Creating Bibliographic Citation Formats
Time to put what we've learned into practice! Imagine you're developing a tool to automatically format bibliographic references. You have the following data:
# Sample data
author = "Hemingway, Ernest"
title = "The Old Man and the Sea"
year = 1952
publisher = "Charles Scribner's Sons"
Your challenge: Using f-strings, create two different citation formats:
Expected output example:
APA Format: Hemingway, Ernest (1952). "The Old Man and the Sea". Charles Scribner's Sons.
MLA Format: Hemingway, Ernest. "The Old Man and the Sea". Charles Scribner's Sons, 1952.
Hints:
Remember you can use f-strings with {variables}.
Quotes inside f-strings can be single or double.
Pay attention to punctuation and spaces.
Ready to try it? The solution is in the next section, but try to solve it first!
Solution to the Bibliography Citation Challenge
# Sample data
author = "Hemingway, Ernest"
title = "The Old Man and the Sea"
year = 1952
publisher = "Charles Scribner's Sons"

# Generating APA citation

apa_citation = f"{author} ({year}). "{title}". {publisher}."

# Generating MLA citation

mla_citation = f"{author}. "{title}". {publisher}, {year}."

# Printing citations

print("APA Format:", apa_citation)
print("MLA Format:", mla_citation)
Excellent! If you managed to create these formats, you're already mastering f-strings. Now, would you like to modify the code to include more information? For example:
Add the publication place.
Handle multiple authors.
Include the edition number.
In the next section, we'll see how we can access specific parts of the text to create even more complex formats.
Accessing Specific Parts of Text
When working with text, we frequently need to extract specific parts: the first character of each response, the last words of a quote, or specific fragments of code. Python offers us two powerful tools for this:
Indexing: allows us to access individual characters, like extracting the first letter of each name in a participant list.
Slicing: allows us to extract text fragments, like obtaining the month from a date or a specific part of a response.
These tools are fundamental for text analysis, whether you're working with interviews, historical documents, or any type of textual data.
1. Accessing Individual Characters ('indexing')
In Python, each character in a text has a numeric position that starts at 0 (not 1), similar to how we count floors in a building starting from floor 0. Thus, in the word "Python", 'P' is at position 0, 'y' at 1, and so on.
When do we need to access individual characters? Some practical examples:
When extracting name initials for data anonymization.
When verifying the first character of survey responses.
When processing identification codes.
When analyzing patterns in texts.
Let's see how to do it:
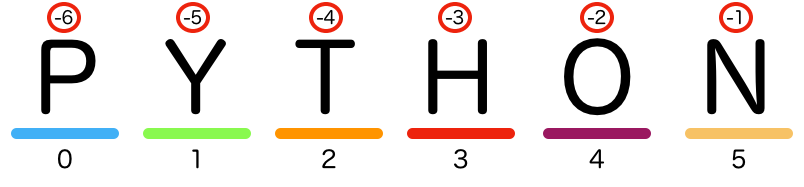
How Indexing Works in Python
In this illustration, we see the word "Python" with each letter placed in a numbered box. Below each letter, we find its corresponding index:
P = 0,
y = 1,
t = 2,
h = 3,
o = 4,
n = 5.
Negative indices are also shown, counting from the end:
n = -1,
o = -2,
h = -3,
t = -4,
y = -5,
P = -6.
This double numbering allows us to access any letter from both the beginning and the end of the word.
When do we need to access individual characters? Here are some practical examples:
When extracting name initials for data anonymization.
When verifying the first character of survey responses.
When processing identification codes.
When analyzing patterns in texts.
Let's see how to do it:
# Basic example
text = "Python"
print(text[0])    # Result: P (first letter)
print(text[1])    # Result: y (second letter)
print(text[-1])   # Result: n (last letter)
print(text[-2])   # Result: o (second to last letter)

# Practical example with survey responses

response = "I like programming"
first_letter = response[0]
last_letter = response[-1]
print(f"First letter: {first_letter}")  # Result: First letter: I
print(f"Last letter: {last_letter}")    # Result: Last letter: g"
2. Extracting Fragments ('slicing')
Slicing is particularly useful when you need to:
Extract specific dates from historical documents.
Obtain relevant fragments from long responses.
Process identification codes by parts.
Separate sections of formatted texts.
Analyze specific parts of transcripts.
Let's look at practical examples:
# Basic slicing example
text = "Python is awesome"
print(text[0:6])    # Result: Python (from 0 to 5)
print(text[7:9])    # Result: is
print(text[10:])    # Result: awesome (from 10 to the end)
print(text[:6])     # Result: Python (from start to 5)

# Practical examples

phrase = "Data analysis"

# Get only "Data"

print(phrase[:4])     # Result: Data

# Get only "analysis"

print(phrase[-8:])    # Result: analysis

# Slicing with steps

text = "Python for data analysis"

# Take every second letter

print(text[::2])    # Result: Pto o dt nlss

# Text in reverse (useful for palindrome analysis)

print(text[::-1])   # Result: sisylana atad rof nohtyP
3. Combining Techniques
The combination of indexing and slicing allows us to perform more sophisticated operations, useful for:
Processing survey data systematically
Extracting specific information from structured documents
Analyzing patterns in interview responses
Preparing data for subsequent analysis
Look at these practical examples:
# Working with survey responses
response = "Yes, I find it interesting"

# Get first word

first_word = response[:3]

# Get last word

last_word = response[-11:]
print(f"Short answer: {first_word}") # Result: Yes
print(f"Last concept: {last_word}") # Result: interesting

# Example of data processing

code = "STU-2023-001"
year = code[4:8]
number = code[-3:]
print(f"Registration year: {year}")  # Result: 2023
print(f"Case number: {number}") # Result: 001"
numero = codigo[-3:]

print(f"Año del registro: {año}") # Resultado: 2023
print(f"Número de caso: {numero}") # Resultado: 001
Second Challenge: Cleaning an Attendance Record
Final challenge! Imagine you have an attendance record from an academic event, but it's poorly formatted. The names are in different formats, some have extra spaces, others are in different cases (upper/lowercase), and you need to clean it up.
# Original record (a single string with line breaks)

record = """
John    Smith    / ID:12345678
Mary     Johnson/ID: 87654321
"""


"""
# Your task is to create a clean format that looks like this:
==========================================
ATTENDANCE RECORD
==========================================
1. John Smith (DNI: 12345678)
2. Mary Johnson (DNI: 87654321)
==========================================
"""
Your challenge: Create a program that:
1. Generates a formatted header.
2. Cleans each line of the record:
Removes extra spaces.
Standardizes the ID format.
3. Presents the information professionally
Concepts to use:
Special characters (for example, \n)
F-strings for formatting
Basic string operations
Indexing and slicing to extract parts
Solution to the Attendance Record Challenge
# Original record with two entries using triple quotes to preserve formatting

record = """
John Smith / ID:12345678
Mary Johnson/ID: 87654321
"""

# Create a decorative line of 42 '=' characters for formatting

line = "=" * 42

# Print the header

print(f"\n{line}") # \n adds a line break before for better presentation
print(" ATTENDANCE RECORD")
print(f"{line}")

# Process the first entry (John Smith)

# Using indexing to extract each part of the text:

name1_1 = record[1:5] # Extract "John" (indices 1 to 4)
name1_2 = record[6:11] # Extract "Smith" (indices 6 to 10)
id1 = record[16:24] # Extract "12345678" (indices 16 to 23)

# Format the line using f-string to combine the parts

print(f"1. {name1_1} {name1_2} (ID: {id1})")

# Process the second entry (Mary Johnson)

# Similar to previous process, but with different indices:

name2_1 = record[26:30] # Extract "Mary" (indices 25 to 28)
name2_2 = record[31:38] # Extract "Johnson" (indices 30 to 36)
id2 = record[42:50] # Extract "87654321" (indices 42 to 49)

# Format the second line

print(f"2. {name2_1} {name2_2} (ID: {id2})")

# Print the final line with an additional line break for better presentation
This code demonstrates the use of:
Triple quotes for multiline text
Indexing to extract specific parts of the text
F-strings for text formatting
Special characters (\n) for format control
Multiplication operators with strings to create separators
Note: This solution uses fixed indices, which works for this specific example. A more robust approach might use string methods like .split() or .replace(), which we'll learn about later.
To Remember
Text strings are like documents in your research: you need to know how to cite them (quotes), how to organize them (operations), and how to extract the important parts (indices and slicing). With this basic knowledge, you're one step closer to automating those tedious text processing tasks that consume so much of your time.
And you know what's best? This is just the beginning. I invite you to test these concepts with your own with interview transcripts, survey responses, historical documents, ethnographic field notes, archive records, literary texts, newspaper articles, legal documents, or any other type of textual material. Take a small sample and apply what you've learned.
Did you have questions or discover something interesting? Share it in the comments! In future posts, we'll explore even more powerful techniques for text analysis. See you next time! 🚀